How To Efficiently Manage Gmail and Android Contacts

To avoid unnecessary stress and to find quick, accurate, and complete information about a needed contact requires efficient contact management. But given the number of different devices and multiple user accounts on those devices, efficient contact management may become quite a difficult task. Because of this, users usually end up saving the same contact multiple times with slightly different names and information. With such a mismanaged list, users often have trouble finding their required contact quickly and accurately.
As a Google user, your task of efficient contact management can be taken care of by the “Google Contacts” app. “Google Contacts” gives you the ability to manage both your Android and Gmail contacts in a single unified place.
In this article, I will show a step-by-step procedure of how can you use the “Google Contacts” app for efficient contact management on a personal computer. To do this, first I will add an imaginary contact to my contact list, then I will edit that contact, and finally, I will delete that contact. So let’s get straight into it.
Adding a new contact
Step 1: Sign in to your Gmail.
Step 2: Click on the Google app launcher in the right upper corner of the window.
Step 3: Now in the drop-down menu, click on “Contacts”. This will cause all your Google contacts to open in a new browser tab.

Step 4: To add a new contact, click on the “Create contact” button in the upper left corner of the screen. In the drop-down menu, click on the first option, “Create a contact”.


Step 5: In the new contact window, type in all the related information such as first name, last name, company name, phone numbers, email address, etc. If you need more fields, click on the “Show more” option at the bottom left of the screen.
Step 6: When you are done filling in all the information about your contact, click on the blue “Save” button to save the new contact to your contact list. You will see a confirmation message for this operation.


Editing an existing contact
I am going to edit the recently added contact with the help of the following steps.
Step 1: Navigate back to the contact list. If you are on the contact creation form, click on “Contacts”, the first option in the menu on the left of the screen, or click on the back arrow towards the left below the search bar.
Step 2: Scroll down to the required contact, and then click on the pen or pencil-like icon in front of it to open it in an editable window. Alternatively, you can also find the required contact by typing its first few characters in the search bar and then selecting the contact by clicking on it in the search results.


Step 3: When the contact is displayed in the editable window. Make changes as desired, and then save the changes, by clicking on the blue “Save” button. That’s it, editing of your contact is now complete.

Deleting an existing contact
Finally, I am going to delete the same contact as follows.
Step 1: Navigate to your contact list and then to your required contact, as in Steps 1 and 2 of the previous section.
Step 2: To delete the contact, click on the three vertical dots in front of the contact and then click on the “Delete” option in the dropdown menu.
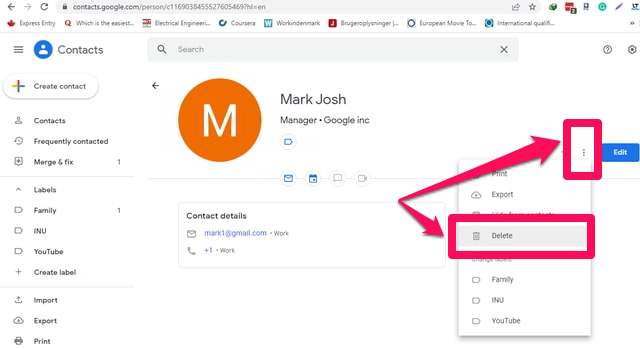
Step 3: Confirm that indeed you want to delete the contact in the displayed dialogue by clicking on the “Delete” button.

Step 4: That’s it, your required contact now stands deleted. If later on needed, you can recover it from the “Trash” folder for up to 30 days from the date of deletion.
Wrapping up
“Google Contacts” provides an efficient solution for managing both your Android and Gmail contacts. New contacts can be added easily, and existing contacts can be edited or deleted in a few simple steps. It must be noted that if you want to manage both your Gmail and Android contacts through the “Google Contacts” then you must use the same Gmail account for both the apps. Another useful feature of “Google Contacts” not covered in this article due to space limitations is that it gives you suggestions for merging similar contacts to get rid of duplicate contacts.