How To Enable, Configure, and Disable “Kid Space” in Android

In the digital age, the use of smart devices by kids is a norm. Allowing kids to consume the right content in moderation might be good for their learning and healthy entertainment.
But the problem is that it is very difficult if not impossible to ensure that they don’t get exposed to inappropriate content. Additionally, they might perform actions that might cause the respective parents or guardians embarrassment and financial losses. This might happen if random actions of a child lead him to a messaging app, a calling app, a purchasing app, or somehow end up sharing personal images and videos of his/her parents stored on the device.
If you have faced such problems before already or have been worried about them, when handing over your phone to your child, Android has got you covered. To solve this problem Android provides you with a feature called “Kid Space”. When in the “Kid Space” mode, your children will only be able to access only certain apps for a limited amount of time configured by the parent or guardian. They will not be able to exit this environment without proper authentication.
In this article, I will explain step by step the process of enabling, configuring, and then disabling the Kids Space mode in Android 11. So let’s get started.
Using Kid Space on Android
Depending upon the Android version and the mobile device you are using this feature might not be entirely available for you or might be available with a different name. In my case, I am using a Realme Device with Android 11.
Step 1: First launch the “Settings” menu from your device.
Step 2: In the “Settings” menu scroll down and tap on the “Privacy” option.
Step 3: In the “Privacy” menu find and tap on the “Kid Space” option.
Step 4: In the “Kid Space” menu let’s first configure the duration of time your kid will be able to access the selected apps by tapping on the “Duration allowed each time” option at the top of the menu.

Step 5: Select the duration per your preference and then navigate back to the main screen of “Kid Space” by tapping on the back arrow in the top left of the screen.
Step 6: Next tap on the “Allowed apps” option to see the list of all the apps installed on your device.
Step 7: Find all the apps you want your kids to access by scrolling down if needed and tapping on the toggle button in front of each of those apps. The toggle button will turn blue showing it will be available in the “Kid Space”.

Step 9: Navigate back to the main screen of “Kid Space” by tapping on the back arrow in the top left of the screen.
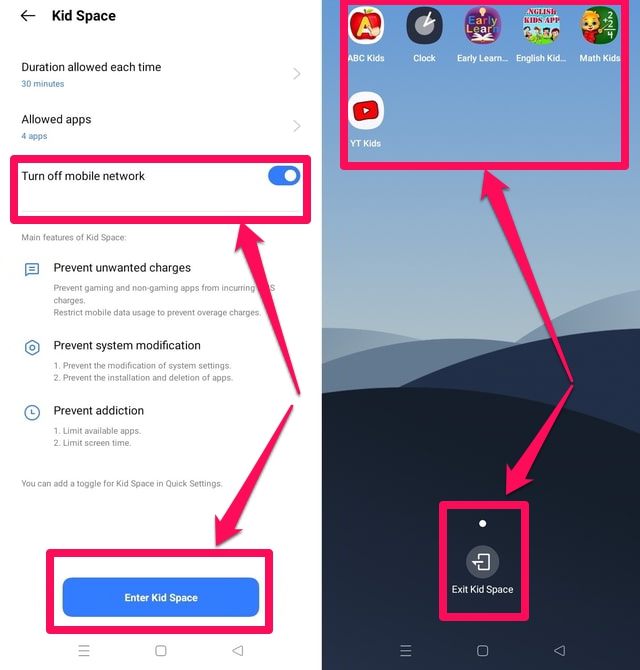
Step 10: If you don’t want your kids to consume your Internet data then tap on the toggle button in front of the “Turn off mobile network” option.
Step 11: The configuration of the “Kid Space” app is now complete. Tap on the blue “Enter Kid Space” button at the bottom middle of the screen to turn it on.
Step 12: The “Kid Space” will now show only the apps you allowed in the “Kid Space” app. To exit tap on the “Exit Kid Space” at the bottom center of the screen. Your phone will come to normal mode after successful authentication.
Conclusion
The “Kid Space” is a very handy tool to restrict the activity of your kids on a smart device to a sub-set of apps for a configured duration. You can do your chores with peace of mind while your kids learn and entertain themselves in a safe and restricted environment.
Moreover, the configuration process is intuitive and easy to do. Let us know in the comments if you know of any other apps specially designed for keeping kids safe when using a smart device.