A Simple Guide To Zip and Unzip Files on Android

Simply put, data compression is the process of transforming your data (documents, pictures, and videos, etc.) into a format that requires less memory storage space. The amount of compression or the reduction in data size depends upon the app used, the nature, type, and contents of the original data. In general, more compression can be achieved if the original data is highly repetitive. Apart from storage space-saving, data compression can help reduce your data bill when sent over the Internet. It also makes it convenient to send multiple files such as images by not requiring you to send them individually but combining them in a single archive.
I am sure you can guess how useful compressing data can be when dealing with lots of large files. Unfortunately, if you want to compress data on an Android phone, there is no built-in way to do so.
Since Android does not have a native application to zip files, we have to look to third-party compression software. There are dozens of compression apps available on Google Playstore (such as WinZip, 7Zipper, ZArchiver, etc.), some of them even belong to reputed companies who have been providing compression apps for personal computers for the last two decades. Among them is one of the most popular compression app called RAR, which I will use next as an example app to show how to zip and unzip files on Android.
How to zip files on Android
Step 1: After installation when you run this app for the first time, it will ask your permission to access the files.
Step 2: After granting access to local files navigate back to the main interface where the app will ask you for app development support. Tap on dismiss to use the app for free.

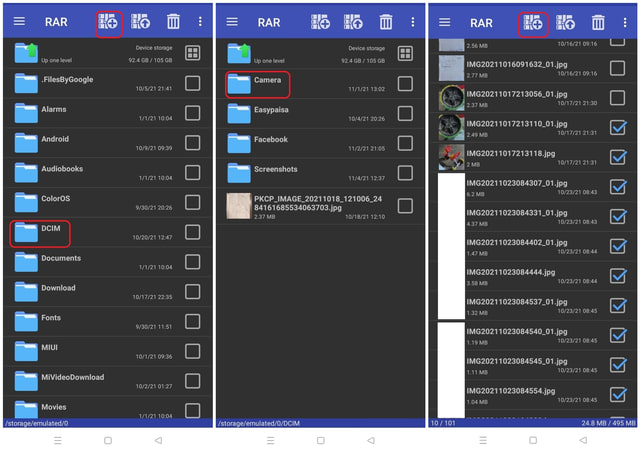
Step 3: The app will now show all the folders on the local phone storage. From this screen, you can navigate to the location of the file or folder you need to zip, such as “DCIM“. You can also tap on the plus icon in the top middle of the screen where you can use browse to go to the location of the file or folder you want to zip.
Step 4: In my case, I will tap the “DCIM” folder and then the “Camera” folder to compress some selected images from my phone storage.
Step 5: Tapping on the “Camera” folder will open its contents and then you can choose individual image files to be zipped. Once the selection is complete you can tap on the plus sign in the upper middle of the screen.
Step 6: Now you can name the compressed archive as per your need, choose the type of compression, and also set a password if needed. Once these choices have been made, tap on the ”OK” button on the bottom left of the screen to start the compression.
Step 7: After the app completes its work, you will see a compressed folder stored in your current folder location as shown below. The compression of your required files is now complete.

How to unzip files on Android
Step 1: To unzip, first run the RAR app and navigate to the location of the zipped files and tap on the square box to select it and then tap on the button with the “Up Arrow”.

Step 2: Next you can either choose the location to which you want to extract your file from the “Browse” button, else the files will be extracted to the current location.
Step 3: Once you have decided the location, you can just tap on the “OK” button at the bottom left of the screen. This will start the decompression process, which after completion will dump the zipped data in uncompressed form in the desired location.

Final thoughts
Compression has been an important technology to save on data transmissions and disk space in Personal Computers. It can be even more useful on mobile devices where storage sizes are even more limited. Apps like RAR for Android can help you immensely in this regard as they are very simple and intuitive to use.